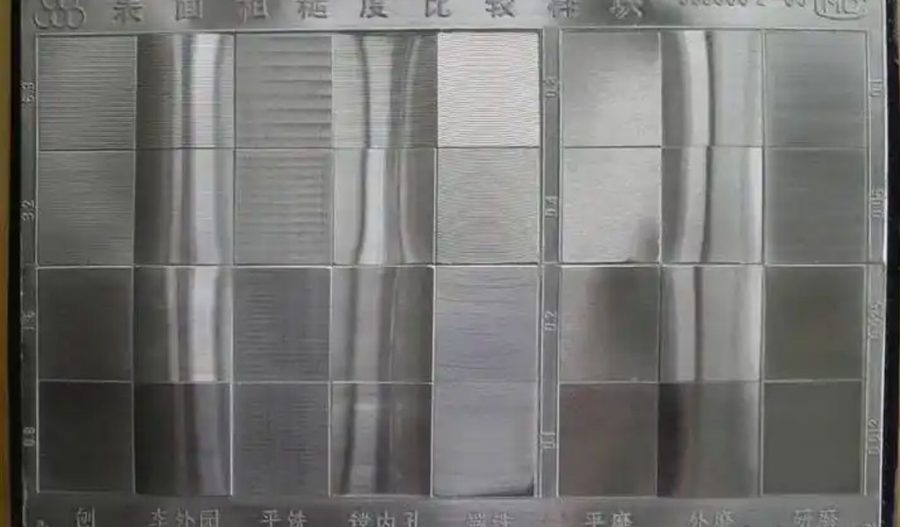
Surface roughness is a critical parameter in manufacturing, engineering, and materials science. It refers to the small, finely spaced deviations from the ideal flat surface of a material that result from the processes used to shape, finish, or treat it. Surface roughness influences the performance, aesthetics, and durability of components, making it essential to measure accurately in order to ensure product quality and meet industry standards. In this comprehensive guide, we explore the methods of measuring surface roughness, the tools used, and the implications of roughness in various industries.
Definition and Importance of Surface Roughness
Surface roughness is defined as the fine, irregular deviations from the nominal surface, which may occur as a result of manufacturing processes such as machining, grinding, or casting. These irregularities are typically measured in terms of height deviations, and their distribution and intensity can significantly impact the function of the part.
Roughness is quantified using parameters that express the average height of these deviations, the spacing between them, and their peak-to-valley measurements. It is important to note that surface roughness is distinct from surface waviness, which refers to larger, more widely spaced deviations.
The significance of surface roughness is substantial across many industries. In mechanical engineering, surface roughness affects friction, wear, lubrication, fatigue strength, and heat transfer. For example, in bearing applications, a smooth surface is essential to reduce friction, whereas, in some sealing applications, a rougher surface may be desired to improve the seal’s effectiveness. In aerospace and automotive industries, precision surface finish is critical for ensuring aerodynamic efficiency, safety, and durability. Similarly, the appearance of a product, particularly in consumer goods and electronics, is often closely related to surface roughness.
Parameters Used to Measure Surface Roughness
There are several standard parameters used to describe surface roughness. These parameters help to quantify the amount of deviation present on a material’s surface and provide insight into how the surface will behave in its application.
- Ra (Arithmetic Average Roughness): This is the most commonly used parameter and represents the average of the absolute deviations from the mean line over a specified length of the surface. Ra is calculated by integrating the absolute values of the surface profile deviations along a sampling length, divided by the length itself. While Ra provides a general measure of roughness, it does not account for the distribution or frequency of the roughness features.
- Rq (Root Mean Square Roughness): Similar to Ra, Rq also measures the average height of the surface deviations but uses the square of the deviations, which emphasizes larger deviations more than Ra does. As a result, Rq is considered to be more sensitive to large peaks or valleys than Ra.
- Rz (Average Maximum Height of the Profile): Rz is the average of the heights of the five highest peaks and the five lowest valleys within a sampling length. This parameter provides a measure of the total height variation on the surface.
- Rt (Total Roughness): This parameter refers to the total vertical distance between the highest peak and the lowest valley in a sampling length. It provides a measurement of the most extreme surface features but can be overly sensitive to outliers and extreme points.
- Rp (Maximum Peak Height): Rp measures the height of the highest peak from the mean line of the surface profile.
- Rv (Maximum Valley Depth): Conversely, Rv measures the depth of the deepest valley from the mean line.
- Sk (Skewness): Skewness indicates the asymmetry of the surface profile. A positive skew indicates that the profile has more peaks than valleys, while a negative skew suggests the opposite.
- Kurtosis: This parameter measures the sharpness or flatness of the surface peaks. A higher kurtosis indicates a surface with sharp, distinct peaks and valleys, while a lower kurtosis indicates a flatter, more uniform surface profile.
These roughness parameters allow manufacturers and engineers to select the most appropriate finish for their parts based on performance requirements, aesthetic preferences, and application-specific needs.
Methods of Measuring Surface Roughness
There are two primary categories of techniques used to measure surface roughness: contact and non-contact methods. Both categories offer different levels of precision, sensitivity, and suitability for different applications.
Contact Methods
Contact-based methods involve physically touching the surface with a probe or stylus that moves across the surface. These methods are widely used due to their accuracy and ability to measure a wide range of surface finishes.
- Stylus Profilometers: The most common contact method for measuring surface roughness is the stylus profilometer. This instrument consists of a fine diamond-tipped stylus that is dragged across the surface of the material. As the stylus moves, it records the surface profile by detecting vertical deviations. The profilometer’s electronics then process the data and provide a roughness measurement, typically in terms of Ra, Rq, or other parameters. Stylus profilometers are highly accurate and can measure both the fine and coarse features of the surface. However, they may be unsuitable for very soft materials or extremely fragile surfaces, as they can damage the surface or cause wear over time.
- Surface Roughness Testers: These are portable versions of stylus profilometers, designed for rapid on-site measurements. Surface roughness testers usually feature a small probe that can be applied to different surface areas. These instruments are ideal for quick checks during production and can provide an immediate reading of the surface roughness.
- Linear Profilometers: Linear profilometers work on a similar principle to stylus profilometers but may involve scanning larger areas or more extensive surfaces. These instruments are especially useful for testing non-cylindrical or complex-shaped surfaces.
- 3D Profilometers: For highly precise measurements of surface features, 3D profilometers are employed. These devices scan the surface in all directions, capturing a detailed topographical map of the surface. The result is a comprehensive 3D representation that can be used to evaluate roughness as well as other characteristics such as waviness, texture, and material inconsistencies. 3D profilometry is particularly useful in research and development and quality control for high-precision components.
Non-Contact Methods
Non-contact methods of surface roughness measurement have gained popularity due to their ability to measure delicate or soft materials without damaging the surface. These methods typically rely on light or laser-based technologies to scan the surface.
- Optical Profilometers: Optical profilometers use light to scan the surface and capture a detailed 3D image of the surface topography. These systems employ various techniques such as white light interferometry, confocal microscopy, and digital holography to measure surface roughness. Optical profilometers are non-destructive, making them ideal for fragile or soft materials. They can also measure larger surface areas more quickly than contact methods.
- Laser Scanning Microscopy: Laser scanning microscopy is another non-contact method used to measure surface roughness. This method uses a laser beam to scan the surface, and the reflection of the beam provides the data used to calculate surface roughness parameters. Laser scanning can achieve very high resolution and is particularly effective for materials with intricate surface textures.
- Confocal Laser Scanning Microscopes (CLSM): Confocal microscopy offers high-resolution 3D imaging of surfaces, making it ideal for analyzing surface roughness at micro and nano scales. CLSM is capable of measuring complex geometries and extremely fine surface features without physically contacting the surface.
- Interferometry: Interferometry is based on the interference of light waves, which creates a pattern of light and dark bands corresponding to the surface features. Interferometric techniques, such as white light interferometry and phase-shifting interferometry, are capable of measuring surface roughness with sub-nanometer precision. These techniques are particularly useful for measuring thin films, coatings, and other highly smooth surfaces.
Factors Affecting Surface Roughness Measurements
There are several factors that can influence the accuracy and reliability of surface roughness measurements, whether they are conducted via contact or non-contact methods.
- Sampling Length: The sampling length refers to the length over which the surface roughness is measured. The choice of sampling length can significantly affect the roughness value obtained, as roughness can vary at different scales. Longer sampling lengths tend to smooth out local fluctuations and provide a more averaged value of surface roughness.
- Orientation of the Surface: The orientation of the surface relative to the measurement tool can affect the roughness readings. For example, surfaces with directional features, such as those created by machining or grinding, will exhibit different roughness values depending on whether the measurements are taken parallel or perpendicular to the direction of the machining marks.
- Surface Material: The material being measured can also affect the roughness measurement. Softer materials may deform under contact measurement tools, altering the readings, while harder materials may cause wear on the stylus or probe, affecting measurement accuracy. Additionally, materials with highly reflective or textured surfaces may present challenges in non-contact measurements, potentially leading to errors or inaccuracies.
- Environmental Conditions: Environmental conditions, such as temperature, humidity, and vibration, can also impact surface roughness measurements. Temperature fluctuations can cause expansion or contraction of the material, influencing surface profile. Likewise, vibrations in the measurement environment can introduce noise or inaccuracies into measurements.
Applications of Surface Roughness Measurement
Surface roughness measurement plays a crucial role in a wide range of industries. Accurate surface characterization is essential for quality control, material selection, and performance prediction in various fields.
- Aerospace: In aerospace applications, surface roughness directly impacts the performance of components such as turbines, engines, and landing gear. For example, the roughness of turbine blades affects aerodynamics, fuel efficiency, and wear resistance. Accurate roughness measurement ensures that parts meet strict tolerances for safety and performance.
- Automotive: Surface roughness is critical in automotive manufacturing, particularly in parts like engine components, pistons, gears, and bearings. In engines, reduced surface roughness can decrease friction and improve fuel efficiency, while increased roughness in some applications, like seals, can improve the component’s performance.
- Medical Devices: Medical devices, especially implants and prosthetics, must have carefully controlled surface roughness to ensure biocompatibility, reduce wear, and enhance the bonding of the device with biological tissues. Roughness measurements are vital in designing implants that will perform optimally over long periods.
- Electronics and Microfabrication: In the electronics industry, the surface finish of semiconductor wafers, microchips, and other components is crucial for device functionality. Surface roughness can affect electrical properties, heat dissipation, and adhesion of thin films, making precise measurements essential in the production of microelectronics.
- Tooling and Manufacturing: In manufacturing, surface roughness measurements are used to assess the effectiveness of machining processes and the condition of tooling. Tool wear and deterioration are reflected in the surface finish of parts, and regular roughness measurements help identify when tools need to be replaced or reconditioned.
- Consumer Products: In consumer products such as smartphones, watches, and kitchen appliances, surface roughness is a key factor in both aesthetics and functionality. Smooth finishes are often desired for aesthetic reasons, while rough finishes may be used in non-slip applications or for texturing surfaces.
Conclusion
Measuring surface roughness is a vital part of modern manufacturing and quality control. Accurate and consistent measurements ensure that parts meet functional, aesthetic, and performance standards. By selecting the appropriate measurement techniques and understanding the various parameters and influencing factors, manufacturers can achieve high-quality results in a range of industries, from aerospace to medical devices and beyond. The evolution of surface measurement technologies, from traditional contact profilometers to advanced non-contact methods, has expanded the capabilities and precision of surface characterization, making it an indispensable tool for engineers and manufacturers worldwide.
Maximize Tooling and CNC Metal Spinning Capabilities.

At BE-CU China Metal Spinning company, we make the most of our equipment while monitoring signs of excess wear and stress. In addition, we look into newer, modern equipment and invest in those that can support or increase our manufacturing capabilities. Our team is very mindful of our machines and tools, so we also routinely maintain them to ensure they don’t negatively impact your part’s quality and productivity.
Talk to us today about making a rapid prototype with our CNC metal spinning service. Get a direct quote by chatting with us here or request a free project review.
BE-CU China CNC Metal Spinning service include : CNC Metal Spinning,Metal Spinning Die,Laser Cutting, Tank Heads Spinning,Metal Hemispheres Spinning,Metal Cones Spinning,Metal Dish-Shaped Spinning,Metal Trumpet Spinning,Metal Venturi Spinning,Aluminum Spinning Products,Stainless Steel Spinning Products,Copper Spinning Products,Brass Spinning Products,Steel Spinning Product,Metal Spinnin LED Reflector,Metal Spinning Pressure Vessel,
